Wednesday, February 24, 2010

Breakfast Blues

back in college, jo and i would wake up every morning excited about the scones in stern dining. laugh all you want, but our cafeteria bakers knew what they were doing! anyhow, in the spirit of nostalgia (since she's coming to visit this weekend!!!!), i decided to make my own blueberry breakfast treats.

Blueberry Scones (adapted from King Arthur's original scone recipe)

Dough
* 2 3/4 cups flour
* 1/3 cup sugar
* 3/4 teaspoon salt
* 1 tablespoon baking powder
* 1/2 cup cold butter (note: i cut this into little pieces to make it easier to mix in)
* 1 1/2 cups of blueberry (fresh is better, but all i had on hand was frozen)
* 2 large eggs
* 2 teaspoons vanilla extract
* 2/3 cup milk

Topping
* 2 teaspoons milk
* 2 tablespoons sugar crystals
(note: i skipped this step- didn't have the sugar crystals. would definitely add next time for aesthetic purposes, haha)

Directions (check out original site for instructional pics: http://www.kingarthurflour.com/recipes/scones-recipe)

1) In a large mixing bowl, whisk together all the dry ingredients.
2) Work in the butter just until the mixture is unevenly crumbly; it's ok to have some chunks of butter not mixed in completely.
3) Stir in blueberries. (note: be careful to not POP them or else they'll end up a lot "bluer" than you would like... as i learned haha)
4) In a separate mixing bowl, whisk together the eggs, vanilla, and milk.
5) Add the wet ingredients to the dry and stir until all is moistened and holds together.
6) Grease baking sheet. Shape the dough to two- 6" circles, about 3/4" thick. (note: original recipe says you don't need to grease the baking sheets, but beware!! my scone bottoms got stuck because of that)
7) Brush each circle with milk, and sprinkle with sugar crystals.
8) Slice each circle into 6 wedges. Carefully pull the wedges away from the center to separate them just a bit; there should be about 1/2" space between them, at their outer edges.
9) IMPORTANT for texture and rise of dough: place pan of sliced scones in the freezer for 30 minutes, uncovered. While the scones are chilling, preheat the oven to 425°F.
10) Bake the scones for 20- 25 minutes, until golden brown.
11) Cool and enjoy with coffee/tea/milk.


Verdict: Moist, light yet buttery with a tinge of sweetness.... though i personally would have preferred crispier edges.


Yay, my roomies and i have breakfast for the week... :)
Sunday, February 21, 2010

On a "Roll" (pun intended, har har)

now that i've discovered the wonders of the bread-machine, i'm on a mission to minimize my consumption of store-bought sliced bread. we'll see how long this lasts. in the meantime, here's the 100% whole wheat bread recipe that's become my staple.

Classic 100% Whole Wheat Sandwich Bread
(adapted from KAF)

**note: i cut the original recipe in half every time to make a small loaf that lasts about 4 days.

3/4 cups lukewarm water
1 1/2 tablespoons olive oil
2 1/2 tablespoons molasses
1 1/2 cups whole wheat flour
1/4 cup bread flour
3/4 teaspoons salt
1 teaspoons active dry yeast

optional: 1/4 cup dry nuts/seeds/fruits (if you want to jazz it up a bit)

1. Proof yeast with some of the warm water and a dash of sugar. Gently mix together all ingredients (no need to stir really well at this point). Let rest, covered for about 20 min. (**Note- still do this if using bread machine. Just let it sit in there before starting the dough cycle).

2. Then, knead the dough until fairly smooth (about 10-15 min or so). Remember, whole wheat dough is not as soft as regular all-purpose flour. **Note: if using bread machine, set on dough cycle and skip to step 4.

3.
Cover dough and allow to rise for 1-2 hrs, until puffy and double in size.

4. Gently deflate the dough, press into a rectangle, and roll up dough to form a loaf, tucking in the edges. Place in a lightly greased 8 1/2 x 4 1/2-inch bread pan (**Note: because my loaf is smaller, I put a placeholder in about 1/4 of the pan- so that my slices are still normal height). Cover the pan with a proof cover or lightly greased plastic wrap and allow bread to rise for about 1 hour, until dough crowns above pan.

5. Preheat oven to 350 F. Bake for 30 min. Rotate 180 degrees and bake another 10-15 minutes.

Sunday, February 14, 2010

Hooray for Whole Wheat!

to debunk the myth that all tasty foods are unhealthy, i decided to try my hand at baking some heart-happy bread (don't get too impressed, i used a machine for the kneading :P). in doing so, i've discovered peter reinhart, who all foodies alike crown as the king of bread. he even has a bread blog that he updates regularly! yes folks, i do believe there is a new man in my life, haha.

since it's my first time working with whole wheat flour, i thought i'd ease into it with his recipe for "light wheat bread," from his bread baker's apprentice book (also featured on smitten kitchen). conclusion: the guy is a genius. the bread was fabulous- more dense than store bought sliced bread but still soft and chewy enough for sandwiches. and the smell of freshly baked bread... just use your imagination. or better yet, try it out for yourself!

Light Wheat Bread- from smitten kitchen
(makes one two-pound loaf)

2 1/2 cups unbleached high-gluten or bread flour
1 1/2 cups whole-wheat flour
1 1/2 tablespoons granulated sugar or honey
1 1/2 teaspoons salt
3 tablespoons dry milk
1 1/2 teaspoons instant yeast or 2 tsp of regular active yeast
2 tablespoons unsalted butter, softened at room temp
1 1/4 cups water at room temp

**notes: i didn't have the dried milk the original recipe called for so i substituted 1/2 the water amt for regular milk. i also primed the yeast with warm water and sugar before adding it all to the mixture.**

1. Stir together the flours, salt, dry milk, and yeast. Add butter, honey/sugar, and water. Stir (or mix on low speed with the paddle attachment) until the ingredients form a ball. If still flour, add drops of water/milk. Dough should be soft and supple. Make sure not too tough! (if you cheat like me and use machine, use "dough" cycle and skip to step 3).

2. Sprinkle some flour on surface and begin kneading (or mix on medium speed with the dough hook). Add more flour if needed to make a firm, supple dough- not sticky. Kneading should take about 10 min (6 min by machine). Lightly oil a large bowl and transfer the dough to the bowl, rolling it around to coat it with oil. Cover bowl with plastic wrap. Let dough rise at room temperature for 1 1/2 to 2 hours- should be double in size.

3. Remove dough from the bowl and press it by hand into a rectangle about 3/4 inch thick, 6 inches wide, and 8 to 10 inches long. Form it into a loaf (SK recommends rolling up the dough; i kind of just folded it). Place in a lightly oiled loaf pan, ends of dough touching pan. Lightly spray oil on top of dough and cover loosely with plastic wrap. Let rise 60-90 min more- until dough crests above lip of pan.

4. Preheat oven to 350 F with rack in middle.

5. Bake 30 min. Rotate 180 degrees for even baking and bake another 10-30 min depending on the oven (mine only needed another 10 min of baking plus 5 min sitting in the oven after heat turned off for color). Finished loaf should look golden brown on top and edges.

6. Remove immediately from loaf pan and cool on rack for 1-2 hrs (haha, uh, i waited about 15 minutes before slicing off a piece!!! :P extra delicious while hot!)

now for your viewing pleasure:


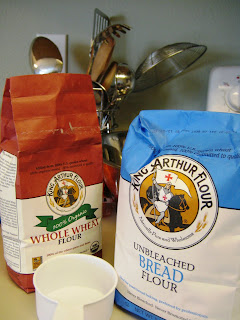
in the words of bogart- king arthur, "i think this is the beginning of a beautiful friendship"


love that whole grain texture!! (note: my slices are short b/c i halved the recipe)


yay crust.


as promised, heart-healthy, meaty goodness


lastly, happy v-day everyone! :)

Wednesday, February 10, 2010

Snack Attack... Chinese- style!

my first day in the MICU, and i had the afternoon off! what better way to spend the extra hours than in the kitchen? :) i decided to try out a scallion pancake recipe- link included below. (sorry, too lazy today to type out instructions :P)

http://appetiteforchina.com/recipes/chinese-scallion-pancakes-photo-photo-recipe

**note: this recipe requires yeast. and the water: flour measurements are definitely off. i had to add a lot of extra flour to get the dough to be the right consistency. but she does provide pictures, which helps


no rolling pin? no problem! improvise with any round-ish surface you have in the kitchen... (i used a beer glass hahaha)


final conclusion: major props to chinese moms who do this on a regular basis!


if you want to try a recipe without yeast, this is from my good friend, joanna:

Scallion Pancakes

1. mix 3 cups flour with 1 cup flour
2. add 1/3 cup cold water and mix til even
3. knead on lightly floured surface until you have smooth ball o'dough
4. let dough rest 30 mintures
5. chop scallions into 1/8" pieces while you wait
6. take dough and form log 2-3 inches in diameter
7. cut log into 6-8 equal pieces
8. take one piece of dough, round than flatten in lightly floured surface
9. roll dough until about 1/16" thick
10. put 1 tsp oil on top, spread evenly
11. sprinkle layer of salt on top then a layer of chopped scallions
12. roll up pancake with scallion side on inside
13. once you've rolledup pancake, take one end of the roll and wrap around the other so it makes a circle (similar to a cinammon roll) (tuck end under so it doesn't unravel)
14. put piece of saran wrap over them and let rest for 30 minutes (so oil can absorb into dough more)
15. roll them out after 30 minutes, flatten with palm first, then roll into round pancake until 1/8" thick
16. put about 1 Tbsp oil in frying pan and fry on medium high heat

let me know which you like better!

Wednesday, February 3, 2010

Baking... with a Vengeance

it's officially february now and winter is still in full swing. :( all this cold, wet, dreary weather (plus some extra time on my hands... gotta love 4th yr, haha) makes me in the mood to bake. below are some sweets (yes, healthy!) to try out for yourself. enjoy!

Gingerbread Squares (courtesy cooking light)


* 1 1/4 cups all-purpose flour
* 1 teaspoon ground ginger
* 1 teaspoon ground cinnamon
* 1/2 teaspoon baking soda
* 1/2 cup sugar
* 1/2 cup low-fat buttermilk (or plain nonfat yogurt)
* 1/2 cup molasses
* 1/3 cup butter, melted
* 1 large egg, lightly beaten

1. Preheat oven to 350°.
2. Combine flour, ginger, cinnamon, and baking soda, stirring with a whisk.
3. Combine sugar, milk, molasses, butter, and egg in large bowl, stirring with a whisk.
4. Stir in flour mixture. Pour batter into a 9-inch square baking pan coated with cooking spray.
5. Bake at 350° for 35 minutes. Cool in pan on a wire rack. Sprinkle with powdered sugar if desired.


Fortune Cookies

(courtesy all recipes- fun to make but not sure if it's worth all the effort)

*2 egg whites
*1/4 tsp vanilla extract
*2 pinches of salt
*1/2 cup flour
*4 tablespoons sugar

1. Preheat oven to 400 degrees F. Butter a cookie sheet. Write fortunes on strips of paper about 4 inches long and 1/2 inch wide.
2. Mix egg white and vanilla until foamy but not stiff. Sift flour, salt, and sugar and blend into egg white mixture.
3. Place teaspoonfuls of batter at least 4 in apart. Spread with spoon or tilt sheet to move the batter into round circles about 3 inches in diameter. Make batter as round and even as possible. Be sure it is VERY thin, so that you can almost see the cookie sheet behind it.
(Do not make more than 2 at a time- the cookie has to be really hot to form and once it cools, it's too late)
4. Bake for 5 minutes or until cookie has turned a golden color 1/2 inch wide around the outer edge of the circle. The center will remain pale.

Note: Next steps require FAST movements!!!
5. Remove from oven. Use spatula to flip cookie upside down on plate. Quickly place fortune in middle of cookie and fold cookie in half.
6. Place the folded edge across the rim of a measuring cup and pull the pointed edges down, one on the inside of the cup and one on the outside. Place folded cookies into muffin tin to hold their shape until firm.
7. After all cookies made, turn off heat in oven. Place muffin tin with cookies in them back in oven to get more of a golden color.