so recently, i've been messing around with fresh basil, and man, is it delicious! one thing's for certain, once you get hooked on the natural stuff, you can't go back to the dried and preserved (just like peanut butter... but that's a tangent for another day). instead of raving on and on about how basil can jazz up even the most basic ingredients, i'm going to throw out two simple recipes for you to try and taste for yourselves!
Tomato, Mozzerella, and Basil Phyllo Dough Pizza
1. preheat oven to 375
2. spread out 7-8 sheets of phyllo dough on lightly greased pan. be sure to follow phyllo dough directions to prevent sheets from drying out and to allow for proper separation between sheets.
3. top with mozzerella or mixture of appropriate cheeses.
4. lay slices of fresh tomato on top.
5. generously add freshly chopped basil.
6. add dash of oregano.
7. sprinkle light coating of cheese over everything.
8. bake 20-30 minutes until crust is golden brown.
serve as appetizer or even main meal!
Tomato and Basil Chicken Capellini
1. heat up olive oil and fresh chopped garlic on stove.
2. cook pasta separately.
3. add some diced onions.
4. add chicken chopped in small chunks. add 1 TBS of fresh basil. mix all together. simmer until chicken cooked through.
5. add red sauce with desired vegetables (i personally like zucchini and mushrooms).
6. add about another pinch or so of fresh basil and freshly ground black pepper. mix.
7. let it all simmer for about 10 minutes.
8. mix with the capellini and serve.
9. top with fresh cheese if so desired.
enjoy with a glass of white wine. a perfect light summer pasta. yums!
and if anyone out there has a favorite basil recipes/suggestions, do share!
Monday, August 25, 2008
Saturday, July 5, 2008
Yay for Vitamin A
spending the 4th of july weekend in SA while everybody else cleared out of town translated into a lot of time to finish moving and settling in, running a gazillion errands, and just straight chillaxin'. so while i still have the time and kitchen all to myself, i decided to do some baking for the friends who helped me move. here goes another food/recipe-related entry (sorry for boring the rest of ya to death... but at least i figured out how to use the camera on my phone!)
Classic Carrot Cake
* 4 eggs
* 1 1/4 cups vegetable oil (purists will scorn this healthier modification preferred by me: 3/4
cups oil, 1/2 cup applesauce)
* 1 cup white sugar, 1 cup brown sugar
* 3 teaspoons vanilla extract
* 2 cups all-purpose flour
* 2 teaspoons baking soda
* 2 teaspoons baking powder
* 1/2 teaspoon salt
* 3 teaspoons ground cinnamon, add dash of nutmeg too if you have some lying around)
* 3 cups grated carrots (don't grate too fine or else will be kind of mushy)
* 1/2- 1 cup of nuts/raisins optional
For frosting:
* 8 ounces cream cheese, softened
* 1/2 cup butter, softened
* 3 1/2 cups powdered sugar
* 1 teaspoon vanilla extract
1. Preheat to 350. Beat eggs, oil, sugar and vanilla.
2. Mix in flour, baking soda, baking powder, salt and cinnamon.
3. Stir in carrots. Fold in nuts if desired.
4. Bake for 40-50 minutes. If making cupcakes, bake 20 min. Cool completely before icing.
5. To make frosting, just beat all ingredients together until smooth and creamy.
piping hot out of the oven...

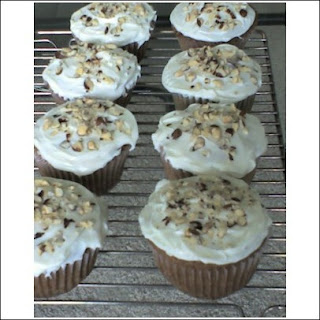
iced with chopped hazelnuts on top... yums!

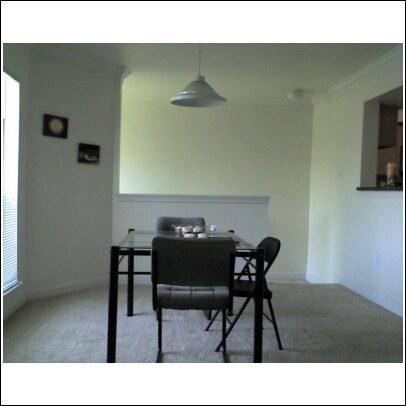
i leave you with my still very bare dining room.

Classic Carrot Cake
* 4 eggs
* 1 1/4 cups vegetable oil (purists will scorn this healthier modification preferred by me: 3/4
cups oil, 1/2 cup applesauce)
* 1 cup white sugar, 1 cup brown sugar
* 3 teaspoons vanilla extract
* 2 cups all-purpose flour
* 2 teaspoons baking soda
* 2 teaspoons baking powder
* 1/2 teaspoon salt
* 3 teaspoons ground cinnamon, add dash of nutmeg too if you have some lying around)
* 3 cups grated carrots (don't grate too fine or else will be kind of mushy)
* 1/2- 1 cup of nuts/raisins optional
For frosting:
* 8 ounces cream cheese, softened
* 1/2 cup butter, softened
* 3 1/2 cups powdered sugar
* 1 teaspoon vanilla extract
1. Preheat to 350. Beat eggs, oil, sugar and vanilla.
2. Mix in flour, baking soda, baking powder, salt and cinnamon.
3. Stir in carrots. Fold in nuts if desired.
4. Bake for 40-50 minutes. If making cupcakes, bake 20 min. Cool completely before icing.
5. To make frosting, just beat all ingredients together until smooth and creamy.
piping hot out of the oven...

iced with chopped hazelnuts on top... yums!


i leave you with my still very bare dining room.
Monday, June 30, 2008
Relocation Station
so i've officially moved into my new apt, and it is niccccce. so nice that even a scrub like me gets excited thinking about decorating. i was actually looking at some art for the walls today... but alas, after cutting the rent check, i will not be buying art for awhile.
i did get to initiate my kitchen tonight by making lettuce wraps found a great recipe on cooking light... quick, easy, tasty, and healthy!! made some modifications with preparations (see below). i added about 1/2 of a regular onion and some cooking wine to deepen the flavor. also used thai satay sauce instead of peanut butter (haha, need to save my precious PB for sandwiches and frozen bananas!! :D) and it worked out great. highly recommend this recipe for all those pfchang/ pei wei fans out there!
i did get to initiate my kitchen tonight by making lettuce wraps found a great recipe on cooking light... quick, easy, tasty, and healthy!! made some modifications with preparations (see below). i added about 1/2 of a regular onion and some cooking wine to deepen the flavor. also used thai satay sauce instead of peanut butter (haha, need to save my precious PB for sandwiches and frozen bananas!! :D) and it worked out great. highly recommend this recipe for all those pfchang/ pei wei fans out there!
Crispy Ginger-and-Garlic Asian Turkey Lettuce Wraps
Ingredients
1 (20-ounce) package lean ground turkey
1 cup chopped shiitake mushrooms (i just used regular mushrooms since i live in SA)
1 (8-ounce) can water chestnuts, drained and chopped
3 garlic cloves, minced
2 tablespoons minced fresh ginger (i definitely put more... but i like gingery stuff)
1/3 cup teriyaki sauce
3 tablespoons creamy peanut butter
1 tablespoon sesame oil
1 tablespoon rice vinegar
1/4 cup hoisin sauce
1/2 cup sliced green onions
1 head iceberg lettuce, separated into leaves
Preparation (modified by me... follow at your own risk!)
1. Cook turkey in skillet about 5 minutes, stirring until turkey crumbles and is no longer pink. (I added a bit of the ginger and onions here and some wine). Remove meat.
2. In same skillet, add onions, ginger, garlic, and all the sauces and cook, stirring constantly for a few minutes. Add mushrooms and water chestnuts to the mix. Stir a few more minutes.
3. Then add turkey back in and mix well! Cover and cook for a few minutes on med-low heat. Uncover and stir again.
4. Serve on lettuce leaves. And if you want to really impress, serve on a bed of vermicelli.
Okay, enjoy the recipe folks! Time for me to estudiar EKGs... tears in heaven. :(
Wednesday, March 26, 2008
dedicated to joanna han, who shares my love for sheng kee. i am proud to say, i introduced her to this deliciousness...
came across this online... we must try it!!!
Bo Lo Bao, aka Pineapple Buns
3 1/2 cups flour
1/4 cup sugar
1 tbsp active dry yeast
1/2 tsp salt
1/4 cup vegetable oil
2 tbsp unsalted butter
1 cup milk
2 eggs, slightly beaten
1. In a large mixing bow, combine 1/2 cup flour, sugar, yeast, and salt.
2. In a separate bowl, melt the butter in the microwave. Add oil and milk to the butter and warm to body temperature. (no idea what this means...98.6 degrees F??!)
3. Pour butter mixture into the flour mixture, add egges (reserve 1 tbsp for egg wash), and stir well to combine. Beat the mixture for 3 minutes.
4. Add remaining flour, a little at a time, until a soft dough is formed. Turn dough out to a floured surface and knead for 8 minutes, adding small amounts of flour if the dough gets too sticky.
5. Place dough in a large bowl and cover with a clean towel. Let rise until doubled in size, about 1.5 hours. During this time, make the "pineapple topping" (recipe below). After the first rising, punch down dough and let rise again until doubled (about 1.5 hours).
6. Divide dough into 12 equal pieces, and shape into flat buns. Place on lightly greased baking sheets, cover with a slightly damp towel, and let rise until doubled (about 45 minutes).
7. At this point, roll out your refrigerated pineapple topping to a 1/2 cm thickness, manipulating the "dough" as little as possible. If too dry, add a small amount of oil. Use a cookie cutter or a glass to cut out circles (12 total) that are slightly less wide than your buns.
8. Brush the buns with a small amount of water, and place your pineapple rounds on top. Lightly score the toppings with a criss-cross pattern, and brush buns with reserved egg.
9. Bake buns at 375 degrees for 10 to 13 minutes on middle rack.
Pineapple Topping
1/3 cup sugar
1/4 cup butter
1 egg yolk
1/2 tsp baking soda
2 tbsp milk
1 cup flour
2 tsp baking powder
1. Beat butter and sugar until creamy and fluffy.
2. Add egg yolk, soda, and milk. Mix well.
3. Sift flour and baking powder into the butter mixture. Mix by hand until smooth and not sticky, being careful not to form gluten.
4. Chill topping, wrapped in plastic,in refrigerator for 1 hour or more.
out of the oven!

yes, the tops are quite large, hehe.

yummy!!

Subscribe to:
Posts (Atom)
